Wednesday, 1 May 2013

Photo A Day April Round Up

I found this photo challenge on Pinterest and decided to join in. 


But on the 1st April I found out that this is last year's challenge. I really wanted to join in with an active photo a day so I switched to this years. As I had already posted the old one to facebook and instagram I decided to continue with both challenges by posting daily for #fmsphotoaday and a round up post at the end of the month.

This was my April 2013 based on #photoadayapril 2012...

1. your reflection
I took my photo using my Banksy print for the reflection. I feel really awkward in this photo. I'm not normally in front of my camera/iphone. 

2. colour
I love these Berol felt tip pens.


3. mail
I waited for the postman for ages but he didn't come. Luckily Ruby was playing Post Offices all morning.

4. someone who makes you happy
I obviously couldn't choose just one of them so I photographed them both :)


5. tiny
A tiny blue button next to a 1p. Taken with a fisheye lens.

6. lunch
Raw vegetables and salad with a cheesy muffin and lime pickle.

7. shadow
I cheated with this one and used a photo of Ruby and I that I took a few weeks ago because there was no sun out today. She really is my shadow and always wants to be by my side. Usually just to annoy her brother!


8. inside my wallet
My Orla Kiely purse. I call it my Mum purse because it is big and when I was little my Mum always had a big purse. It's full of receipts and coppers!

9. younger me
Me and my brother dressed as Native American Indians for a picnic in the park. Mum made our outfits including one for my dolly. If you look closely you can see Andrew's arrow that didn't travel very far! I'm guessing that we are 4 and 6 here?


10. cold
I felt cold so spent an hour snuggled under my duvet watching Prisoners Wives on the iPlayer.

11. where I ate breakfast
Jacob went on a sleepover last night. I expected a call at 10pm saying he was coming home but the phone didn't ring! Ruby and I had a relaxing breakfast, sitting on the sofa, watching cartoons and eating toast.


12. stairs
The majority of people who have visited our house ask when we are getting rid of our stairs! We have no plans to, they are one of the reasons we bought this house. As long as you start off on your right foot and keep going till you get to the top you won't fall down!

13. something I found
I didn't actually find this, Ruby did but she gave it to me.


14. how I feel today
Today I feel proud of my little man, who ran the Brighton Marathon Mini Mile. He is feeling proud of himself too. 


15. sunset
I missed the sunset tonight, luckily Jacob made this sunset badge at Hove Museum.


Half Way! I'm loving this photo a day challenge. It's like a diary. I've always intended to keep one but never find the time. Taking a photo a day is a great way of remembering what happens over the month.

16. flower
Forsythia on the way home from dropping the kids at school. I love the colour. It tells me that it is spring and it makes me miss our old front garden.

17. something you don't like
Soggy cereal!


18. hair
This should have been for yesterday when I was having a good hair day!

19. orange
It's always the oranges that are last to be eaten in our house.


20. something you drew
Pussy cat, pussy cat, where have you been?

21. bottle
Jacob's science experiment! A weather barometer now lives on the windowsill. How long till I can recycle it?


22. the last thing you bought
The weekly shop.

23. vegetable
We eat a lot of carrots in our house.


24. something you're grateful for
My sewing machine. It keeps my hands and creative side busy! How cute is Jacob's little machine next to mine!

25. looking down
Hello Baby Bernard and Gobi!


26. black and white
Wallpaper samples. Orla Kiely Acorns and MissPrint Mountains

27. somewhere you went
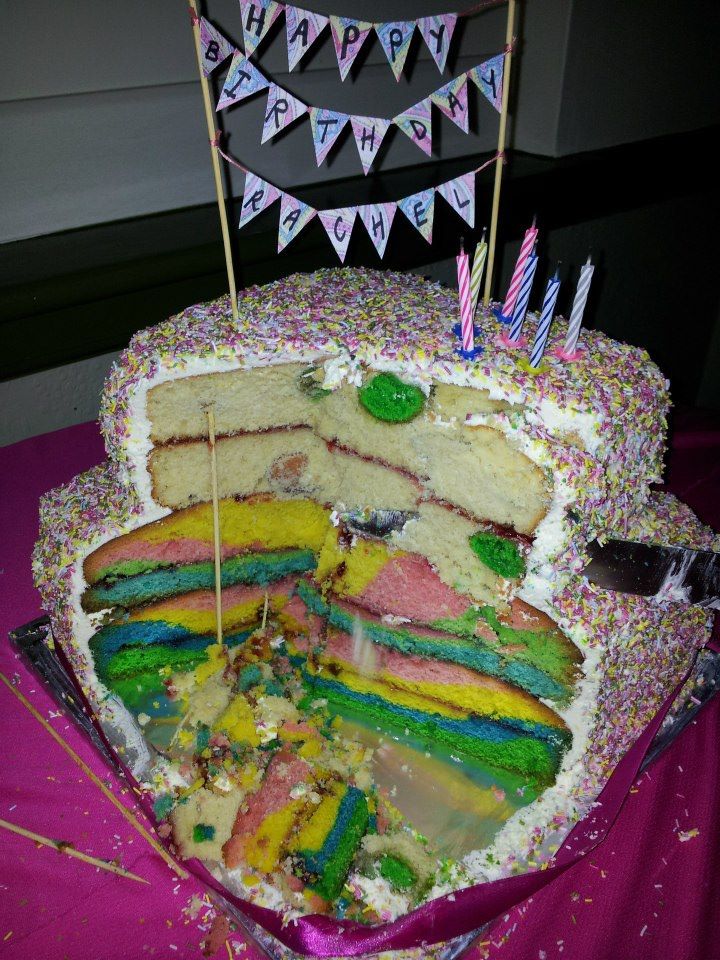
Rachel's Party!


28. 1pm
Mum Cabs! Dropping Jacob off at the St George's Day Parade.

29. circle
Blue circle inside the Polka Dot Cake!


30. something that makes you sad
Ruby starting school in September. Her pre-school days are nearly over :(


My favourite photo...
...of this challenge is this one of our Guinea Pigs, Baby Bernard and Gobi. Now that they weather is warming up we are able to let them out of the garage and into the garden. I'll be honest I am not a big fan of rodents but these two are growing on me and I find it peaceful watching them sitting in their playpen eating grass. 


And that was it, April is over and now it is May. It feels like this year is flying by but when I look back at the first couple of photo's they seem like a long time ago. 


Tuesday, 30 April 2013

Sprinkle Polka Dot and Rainbow Marble Cake Tutorial - Part 2 Polka Dot Cake

Polka Dot Cake, Let's go!

I used this post by Once Upon a Pedestal for inspiration.

First you need to make the cake balls. I tried lots of different ways of making the balls here. In the end  I used a Popcake Maker as it gave the best dots. 
Instead of using the recommended mix I used a standard cake mix:
100g butter/marg, 100g caster sugar, 2 eggs, 5ml of vanilla extract 100g self raising flour (cake making method in Part 1) so that their consistency matched the main cake. This quantity made approx. 48 balls.
I split the mix into 4 batches and added the colouring and baked them for the recommend time in the instructions leaflet. 


When they were cooked they looked like this, So colourful!

I made the dots/balls the week before the party so popped them in the freezer until I needed them. If you are going to use them straight away wait till they are completely cooled before adding them to the cake.

Now it is time to make the cake.

Pre-heat your oven, grease and line your tin.

Mix up a batch of vanilla cake mix to the required quantity for your cake tin. You can use the recipe in Part 1 of this tutorial and this guide for quantity. Or use a shop bought cake mix and bake to their instructions.

Add a small layer of white cake mix to the base of your tin, spreading to the edges of the tin. Split the number of dots between your tins if you are doing more than one layer.

Cover the dots with the remaining cake mix and bake for the required amount of time depending on your tin.


When it's cooked allow to cool before assembling. 

Add your filling of choice and cover in your favourtite frosting. I used white chocolate swiss mergingue using this really detailed tutorial by Sweetapolita.


And then covered it in sprinkles!


To assemble the two tiers. I made two 30x30cm cakes for the bottom cake and added seedless raspberry jam between the layers. The polka dot cake went on top, again with the raspberry jam inbetween the layers. I secured the top tier to the bottom one using bamboo skewers cut to the same depth as the cake and the applied a first coat of buttercream as a crumb coat. This stops the cake crumbs coming off during the top coat and making it look yucky. I then sprinkled the sugar strands on, for the side I had to pack them on using the palm of my hand. To finish off I attached a pretty pink ribbon and made some super cute cake bunting.


For the cake bunting I used some of the party invitation paper and cut out diamonds that I folded in half to make triangle flags. I used some embroidery thread and glued the triangles together to hold them onto the string. I then cut little notches out of the bamboo kebab sticks so that the thread didn't slip when I tied it on.


This cake was so much fun to make. If you want to give it a go for yourself and have any questions give me a shout!


Sprinkle Polka Dot and Rainbow Marble Cake Tutorial - Part 1 Rainbow Marble Cake

Here it is the biggest cake I have ever made. A massive 2 tier polka dot and rainbow sprinkle cake. I think in the end it weighed 7kg!

On the outside 6 packets of sugar strands (it could have done with 8 but I ran out of time to pop back to the shop).


The special surprise inside!


Rainbows and Polka Dots!

If you would like to make one too here is how!

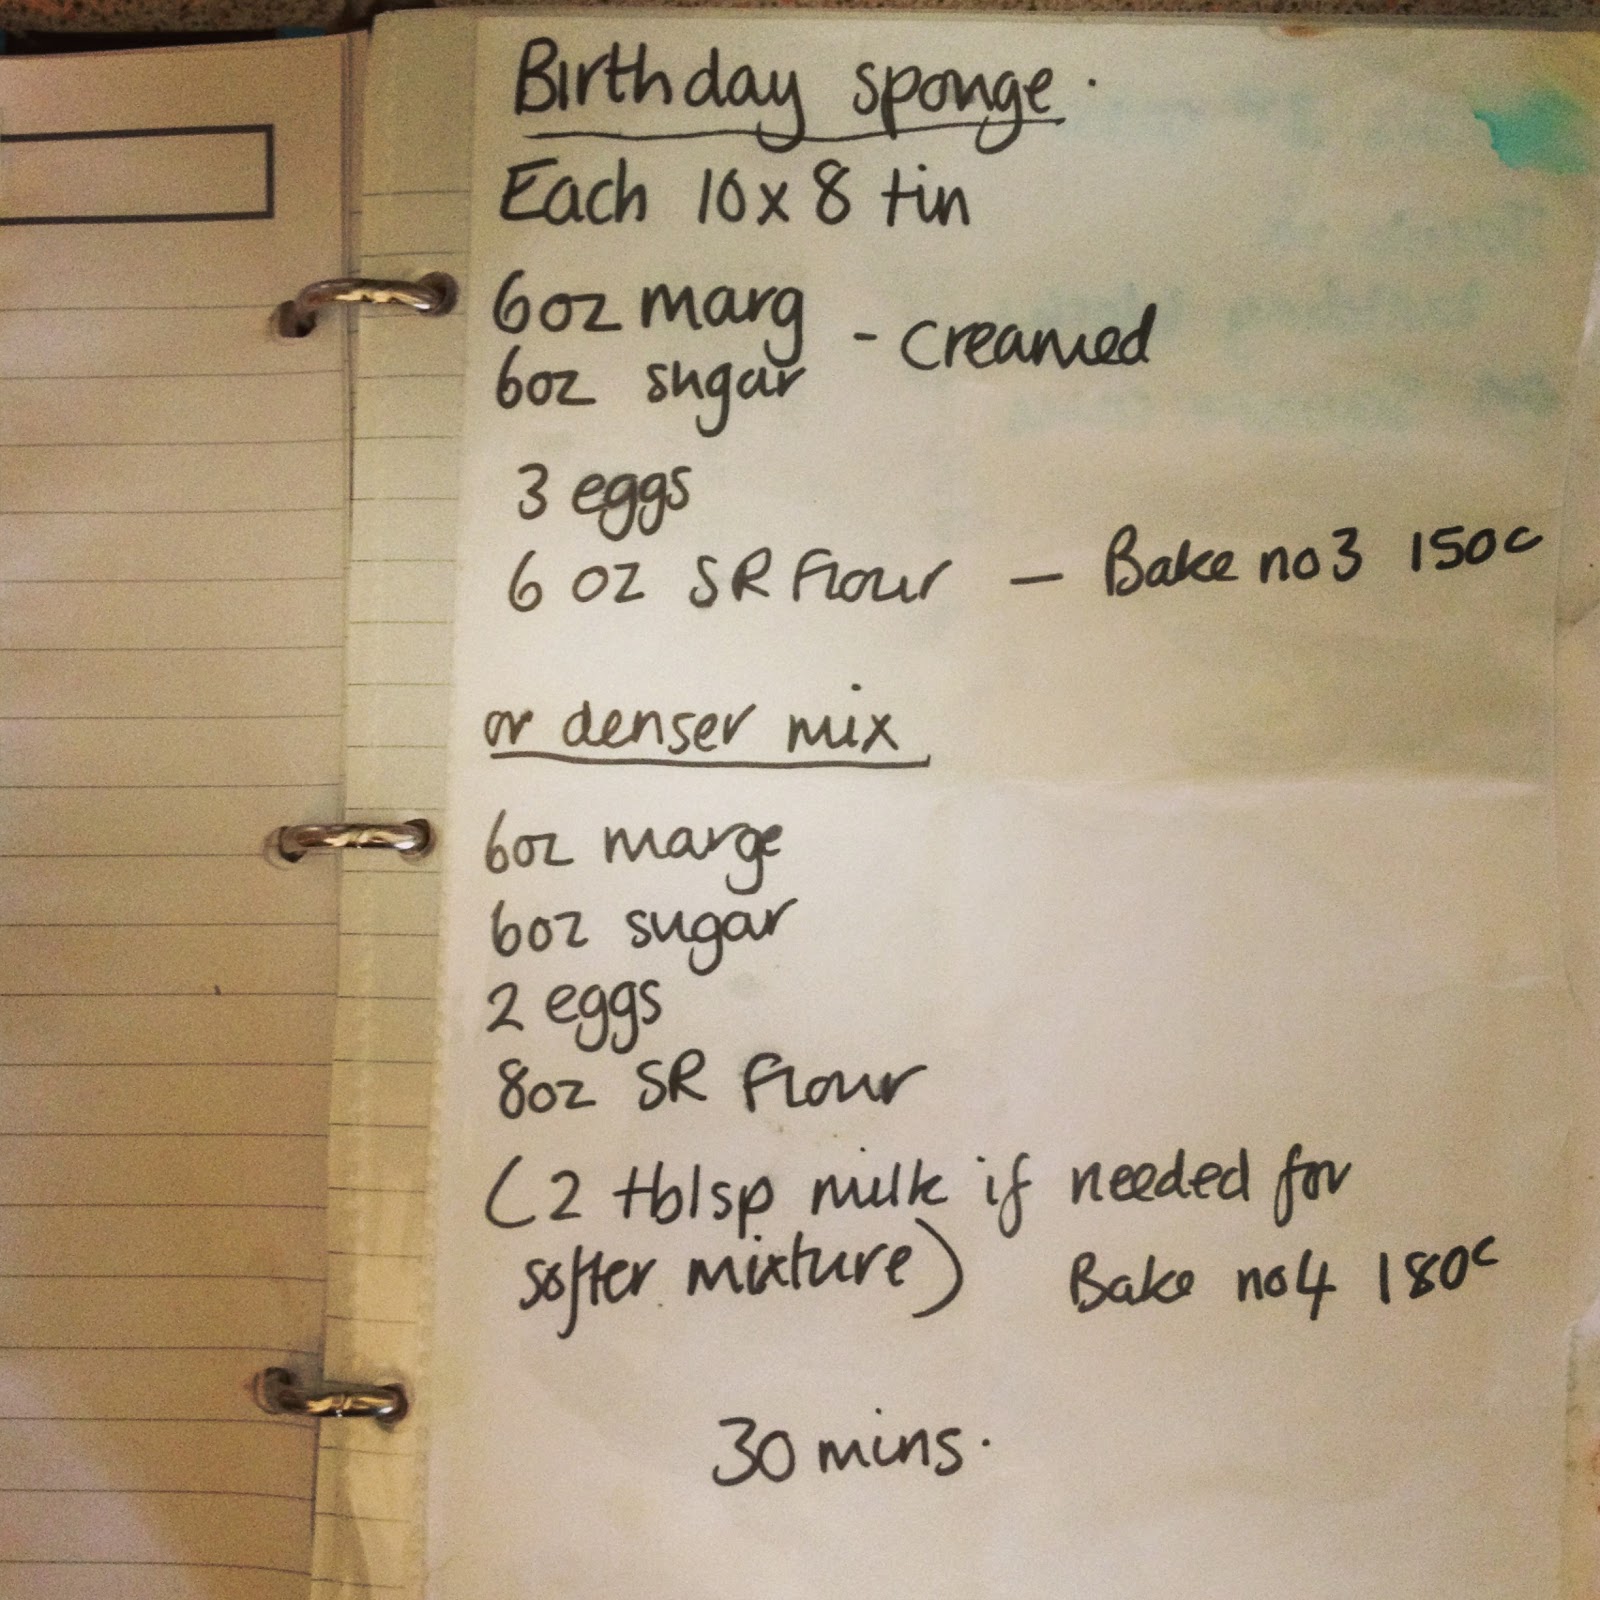
I used this recipe and the denser mix recipe as it needed to be sturdy!


Recipe in grams for a 25cmx20cm tin:
150g butter/marg (I use stork)
150g caster sugar
2 medium eggs (120g) lightly beaten
200g self raising flour
2 tablespoons (30ml) of milk if needed to soften mix
1 teaspoon (5ml)
Food colourings of your choice
180c / gas mark 4 
for 30 mins

You probably don't need to make such a massive cake, but you can use the above recipe and method below to make the cake to any size you want to.

Depending on the size of your tin calculate how much mix you will need. I found this really good guide for tin sizes, cake mixture and icing quantities here.

Bottom Tier Rainbow Marble Cake

Grease and line your tins and pre-heat the oven to 180c (because my cake was so large I dropped the heat to 170c and increased the cooking time)

Weigh out your ingredients. In a bowl (or electric mixer bowl) cream the butter and sugar until it is light in colour. Add the vanilla. Add the lightly beaten eggs and continue to whisk (by hand or electric mixer) to combine. If your mix starts to curdle had a desert spoon of sifted flour and continue to whisk. Turn off whisk and sift in flour a little at a time. Using a metal spoon fold the flour in using a figure of 8 movement taking care not to knock out the air you have just whisked in with the egg. If the mixture is too stiff to stir gently add the milk and combine.

Take 4 bowls (or however many colours you want to use) and divide the mixture equally. To each bowl of mixture add the food colourings, the more you use the stronger the colour will be.


Start with your darkest colour and empty the mix into the middle of the tin.


Give the tin a gentle shake to get the mix into the corners and pop it in the oven.
When it comes out it will look something like this!


You can then add your filling of choice (I used seedless raspberry jam) and cover with buttercream. 
I used white chocolate swiss meringue buttercream and used this fantastic tutorial on Sweetapolita. I could spend hours looking at the lovely creations on this site!

If you want to add a polka dot cake on top my tutorial for that is coming up next!


Related Posts Plugin for WordPress, Blogger...